• Home
  • About
    • About
    • Contact
  • Style
    • Spring
    • Summer
    • Fall
      • Pre-fall
    • Winter
      • Holiday Style
    • Maternity
  • Lifestyle
    • Motherhood
  • Outfits
  • Shop
    • Recently Purchased
    • Shop My Instagram
    • Lilly’s Picks
    • Sales

CLASSY SASSY

Uncategorized

Gettin’ Crafty: DIY Vintage Monogram Picture Frame

June 6, 2013

Happy Friday, lovelies!
I have got a fun, easy, and cheap DIY project to share with you all today!  Who knows, this might be a fun project for you to tackle this weekend.

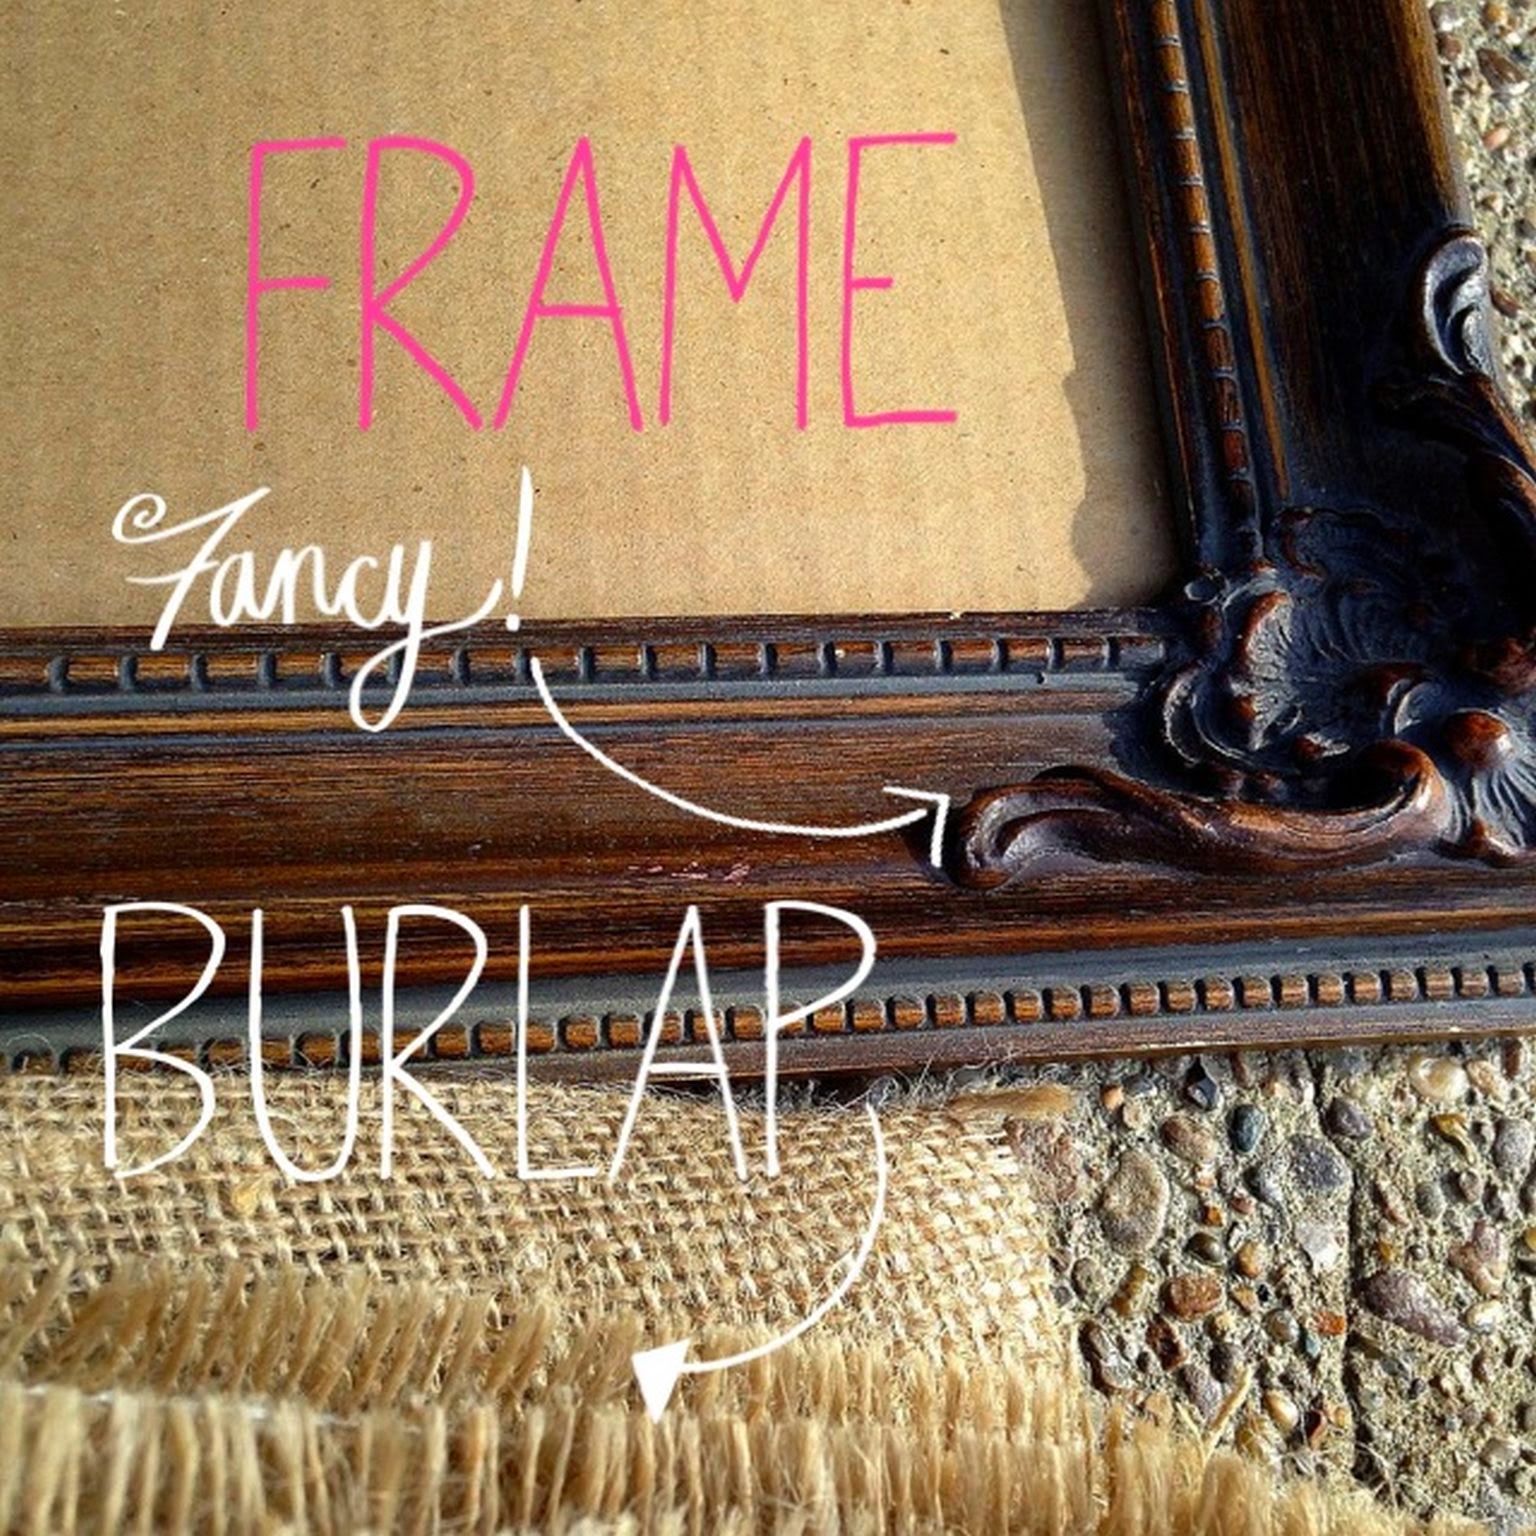
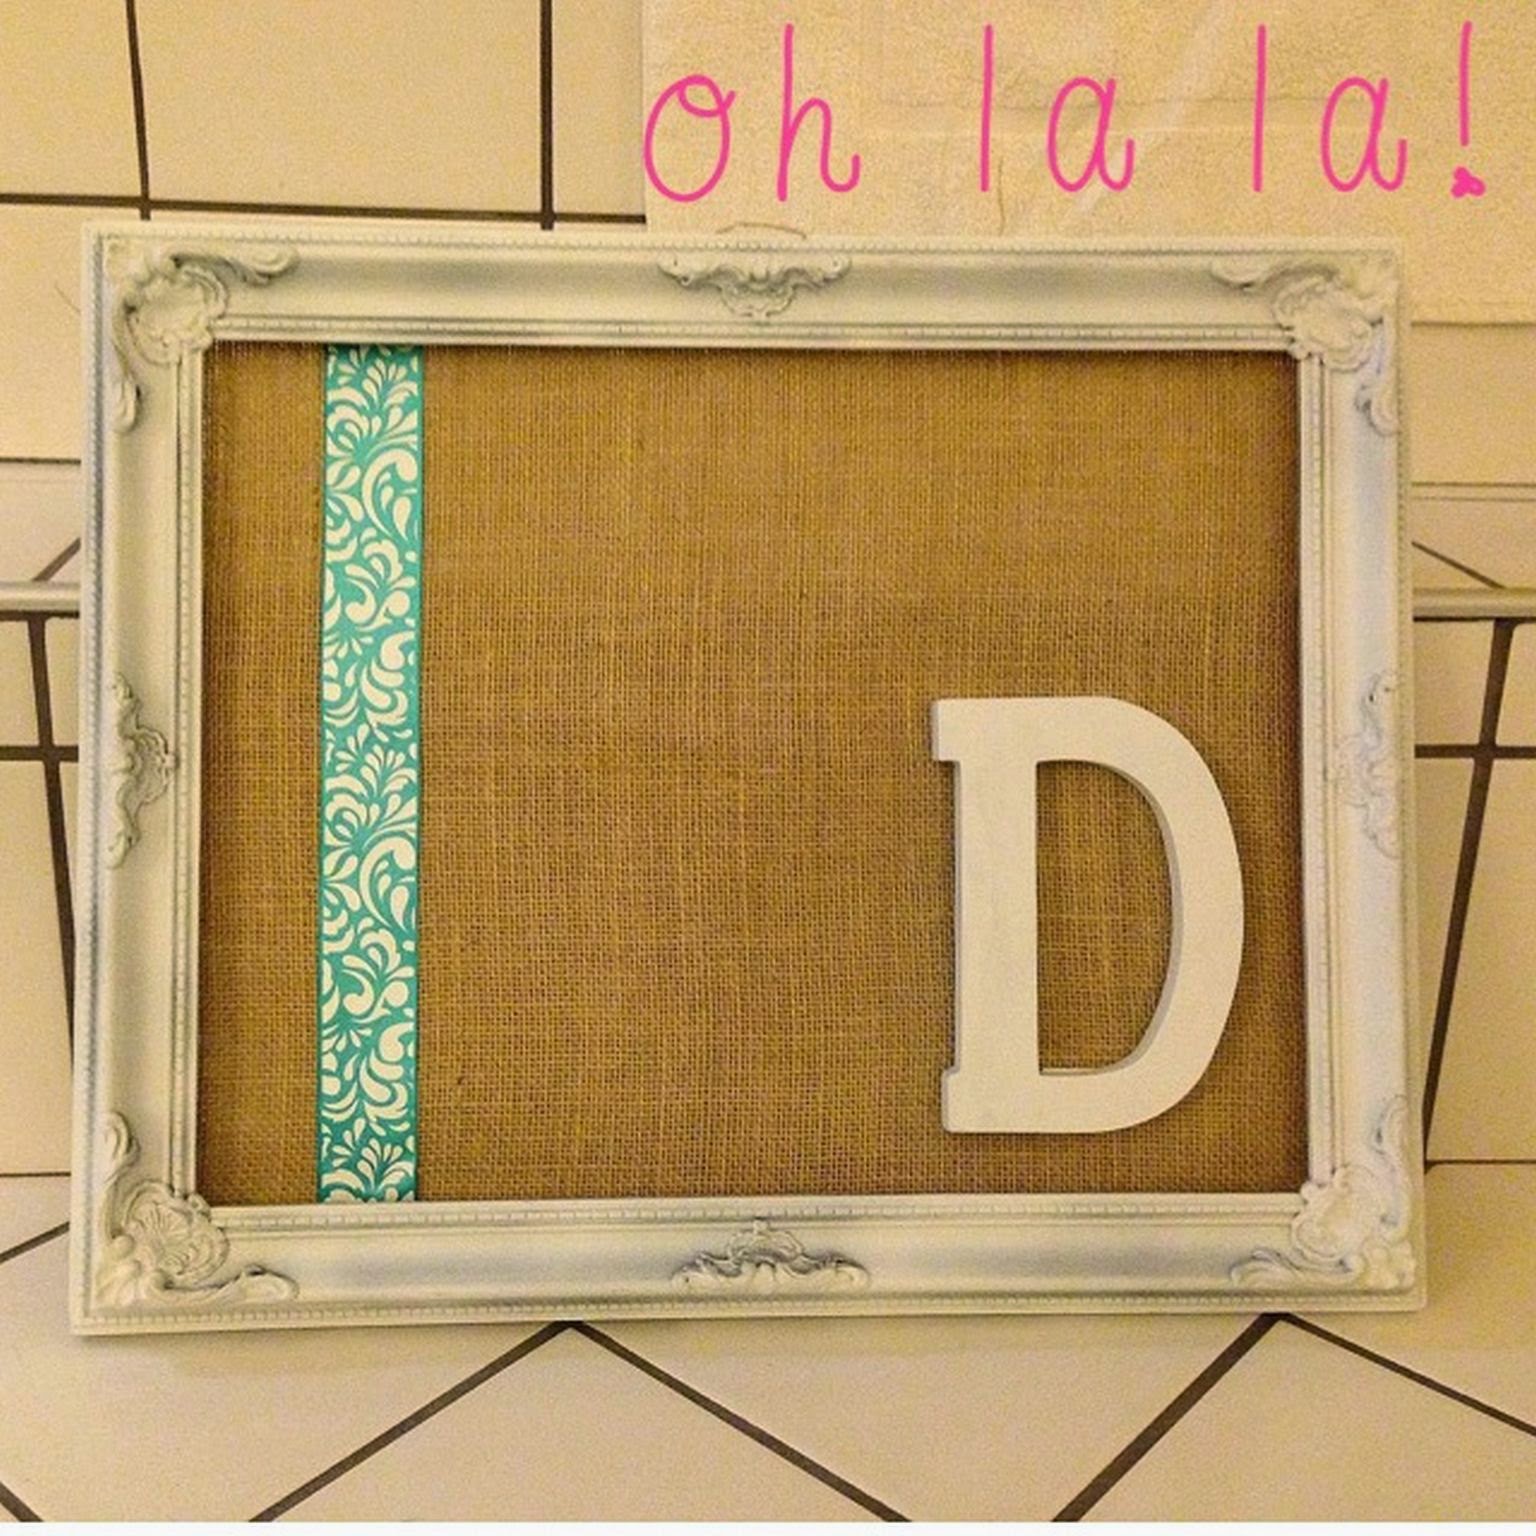
This is the picture frame that I made for my best friend’s wedding present last week, and I am quite surprised at how well it turned out.  I wish I could take credit for the inspiration, but I actually saw this hanging on a friend’s wall in her house.  I have done similar projects like this, with burlap and frames, or spray painting letters and framing them, but for some reason, it just hadn’t clicked to combine both ideas.  It’s one of those ideas that given a little more time, I’m sure I would have thought of it eventually….But probably not in time for the wedding, so I am thankful for finding inspiration from my crafty friend (Thanks, L!).

Materials Needed:
Decorative wooden frame (discard glass)
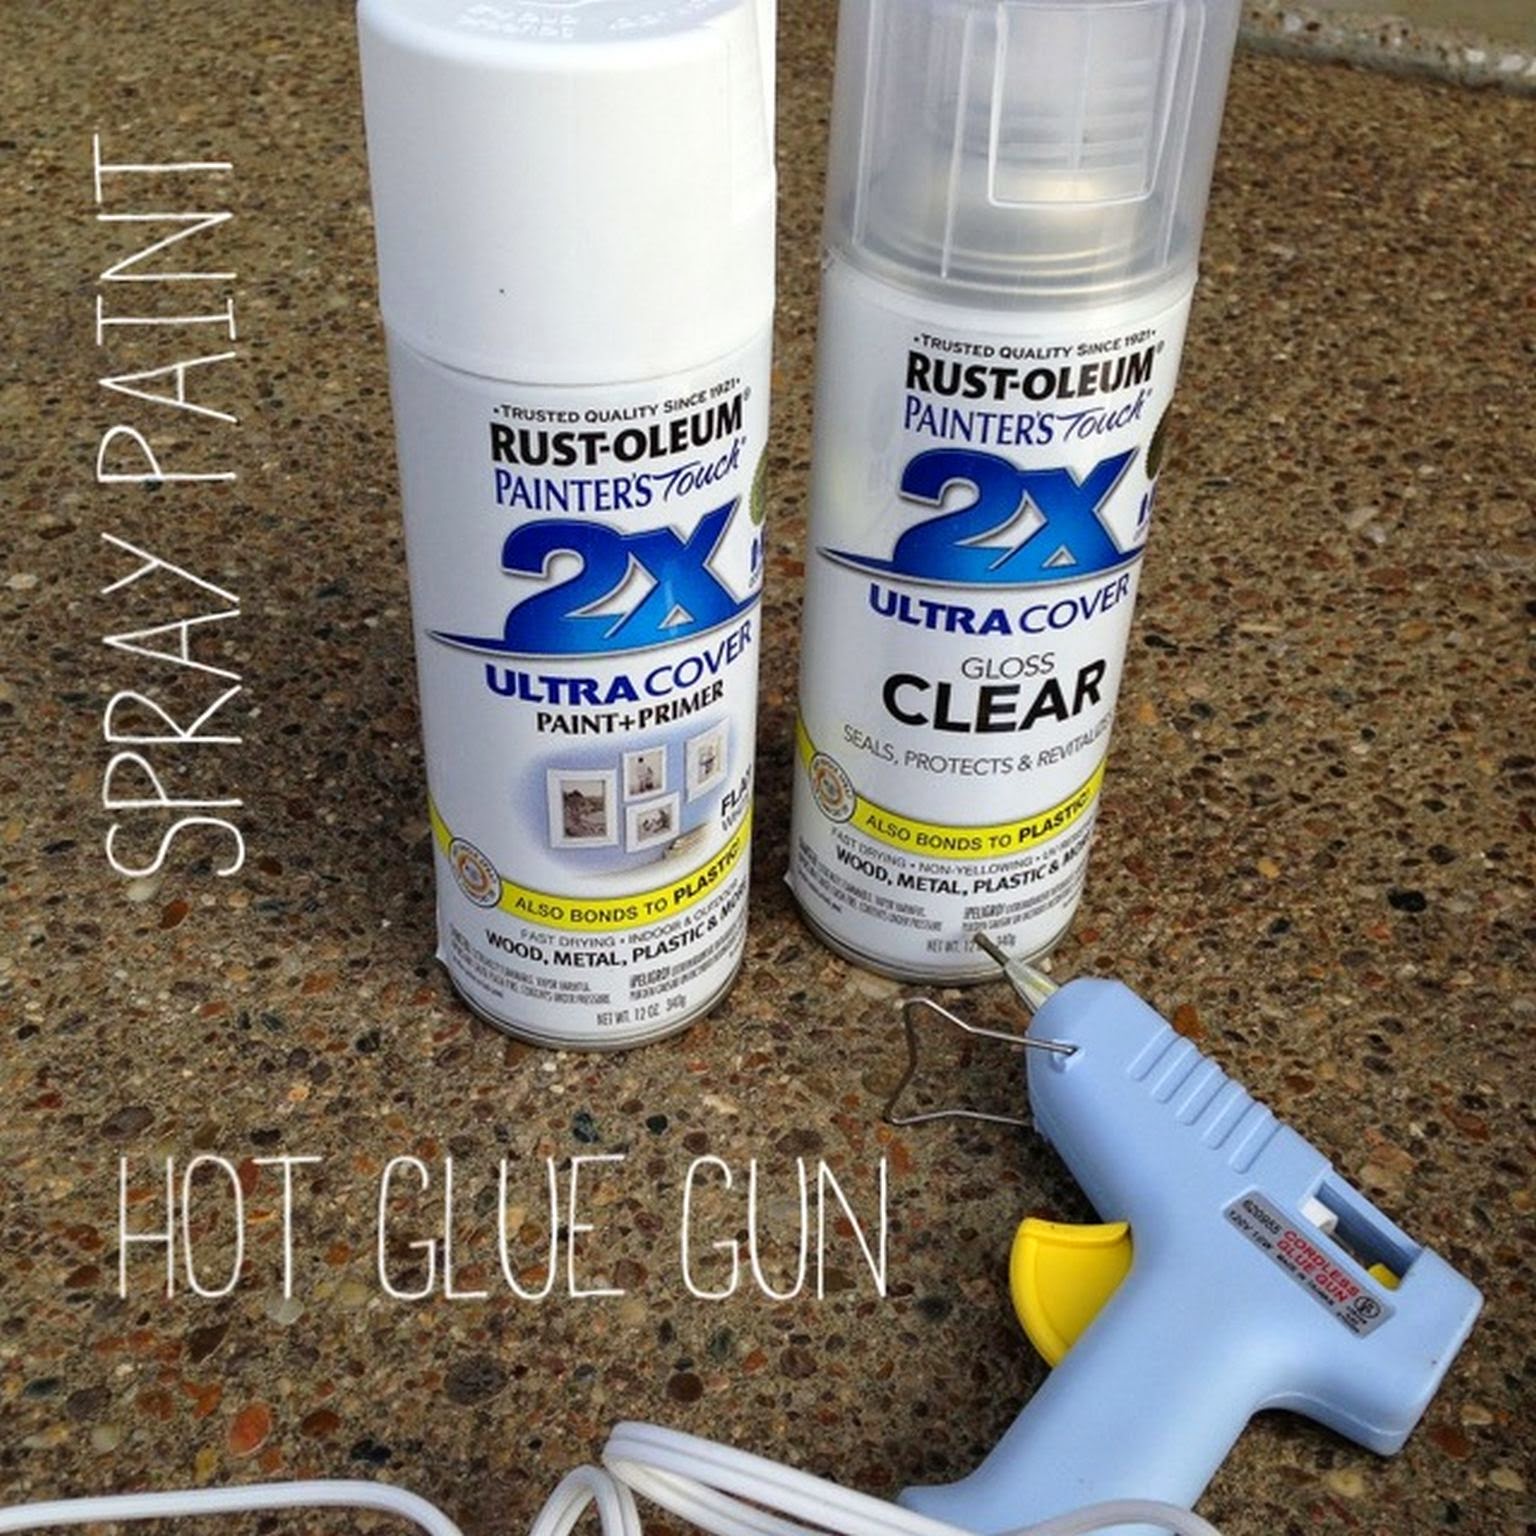
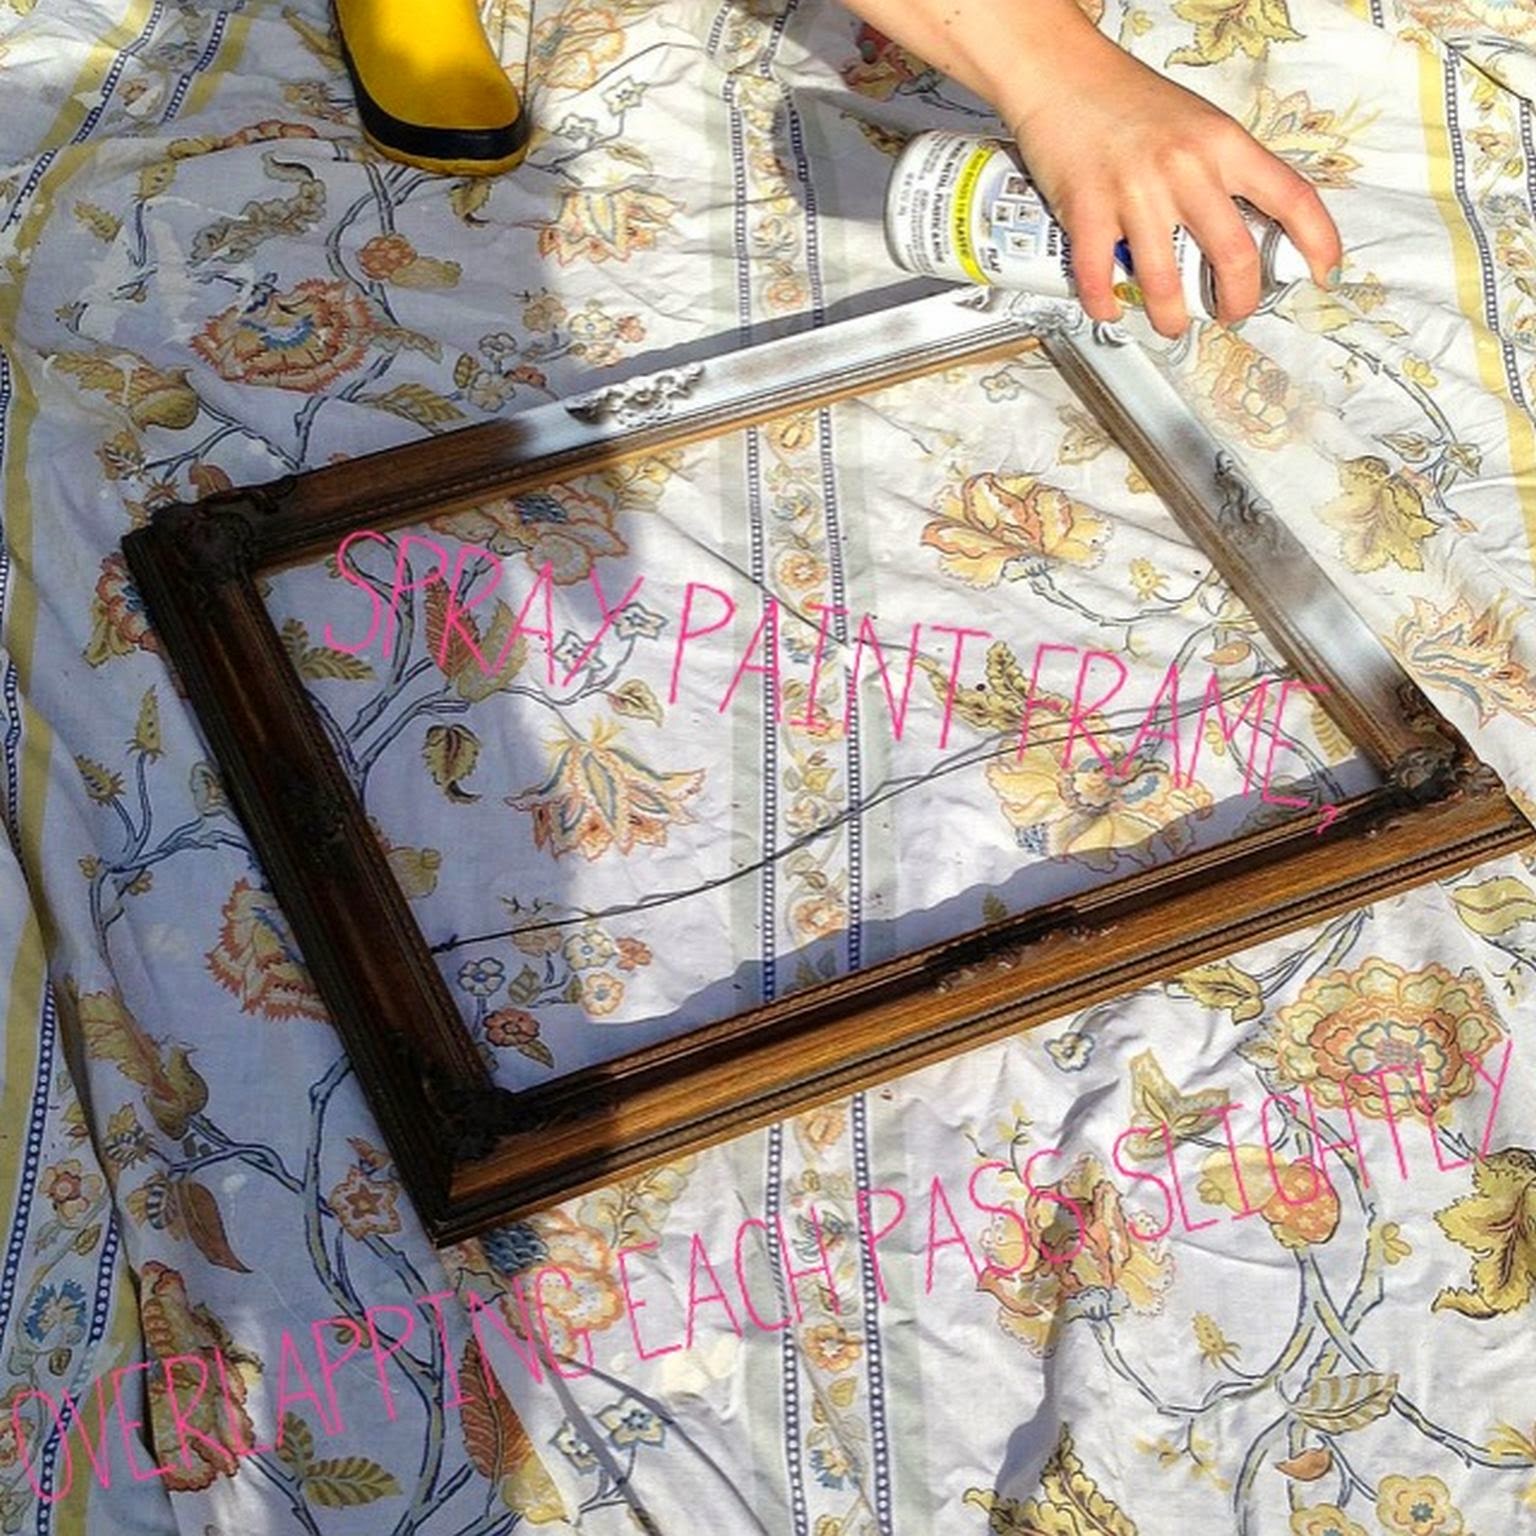
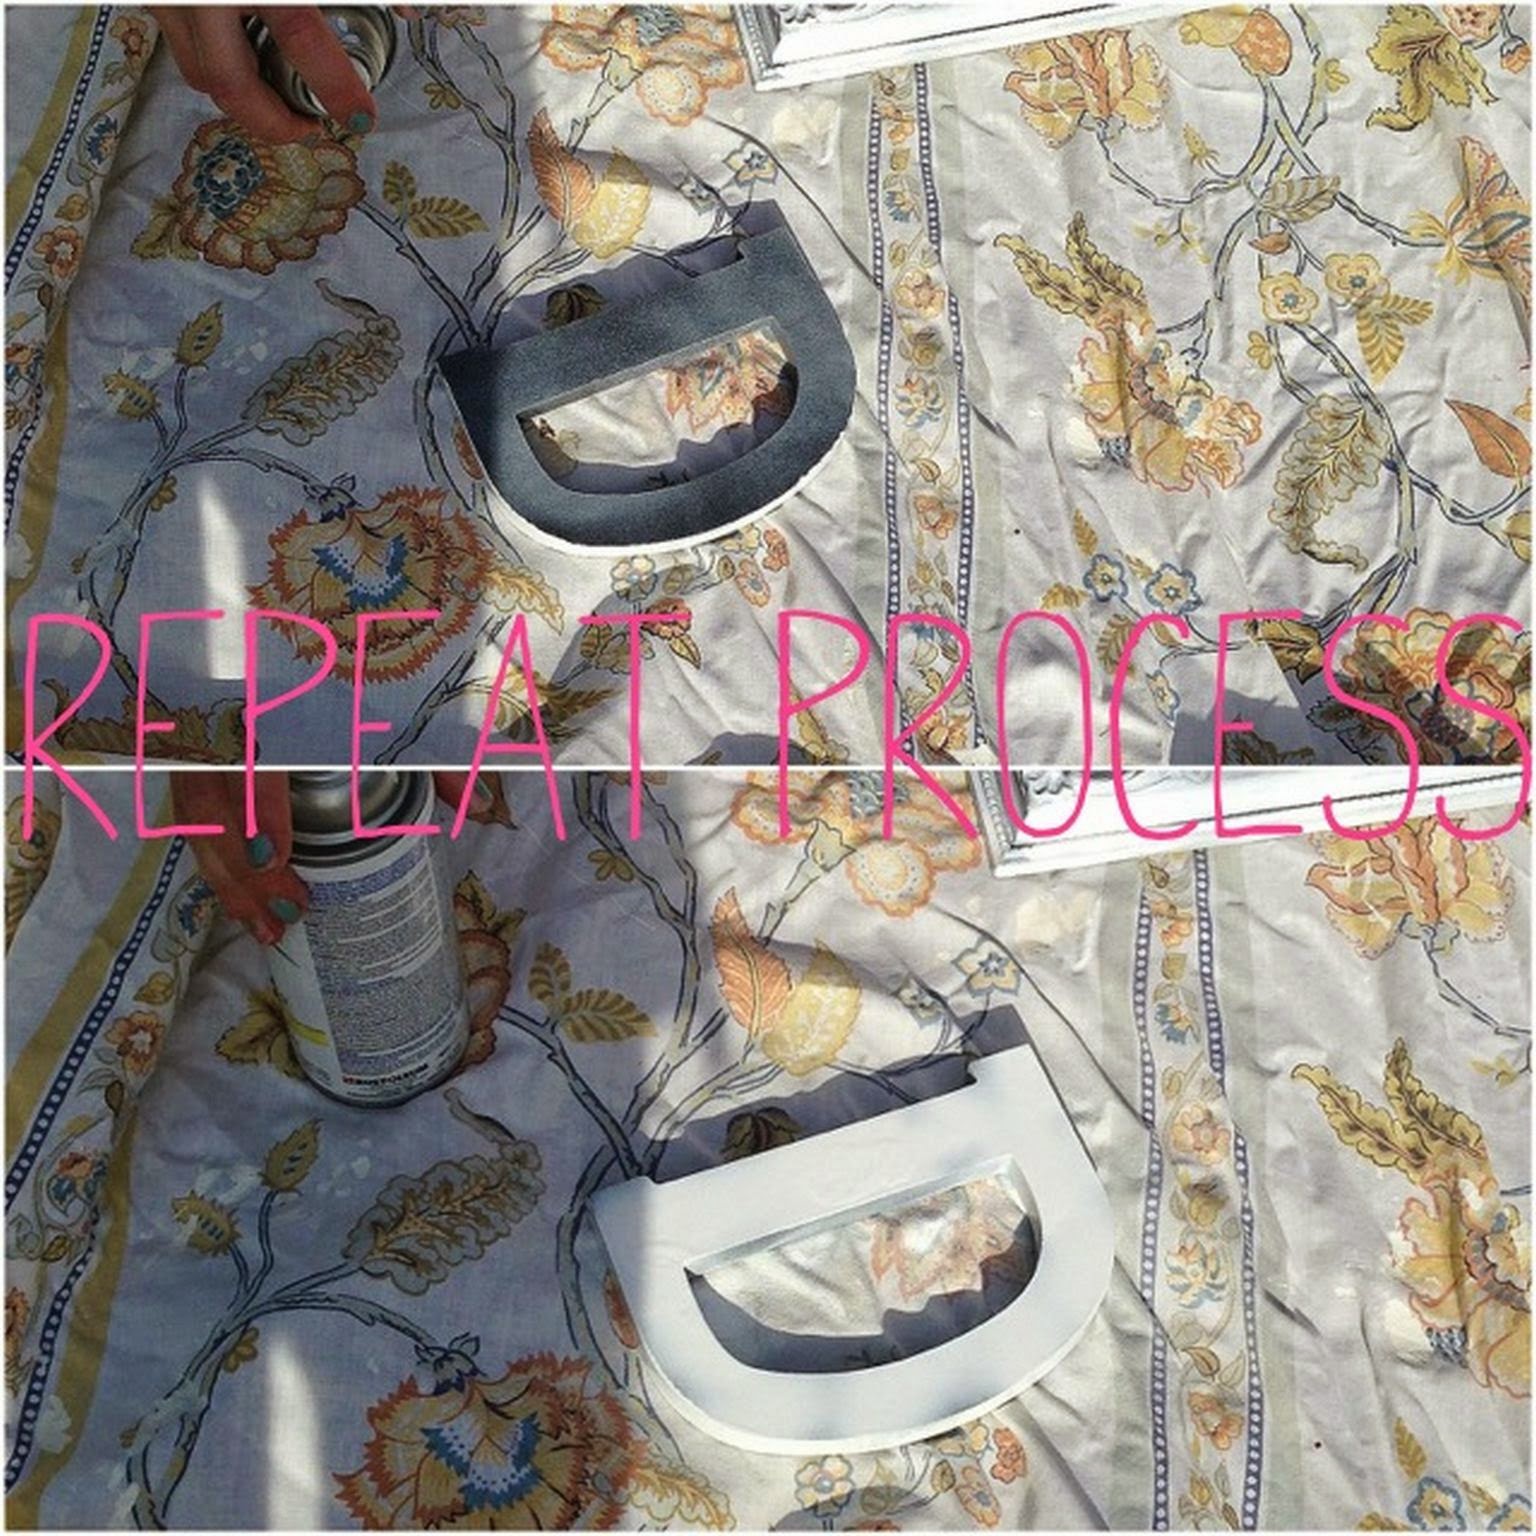
Spray paint (I used Rust-Oleum Paint & Primer in white)
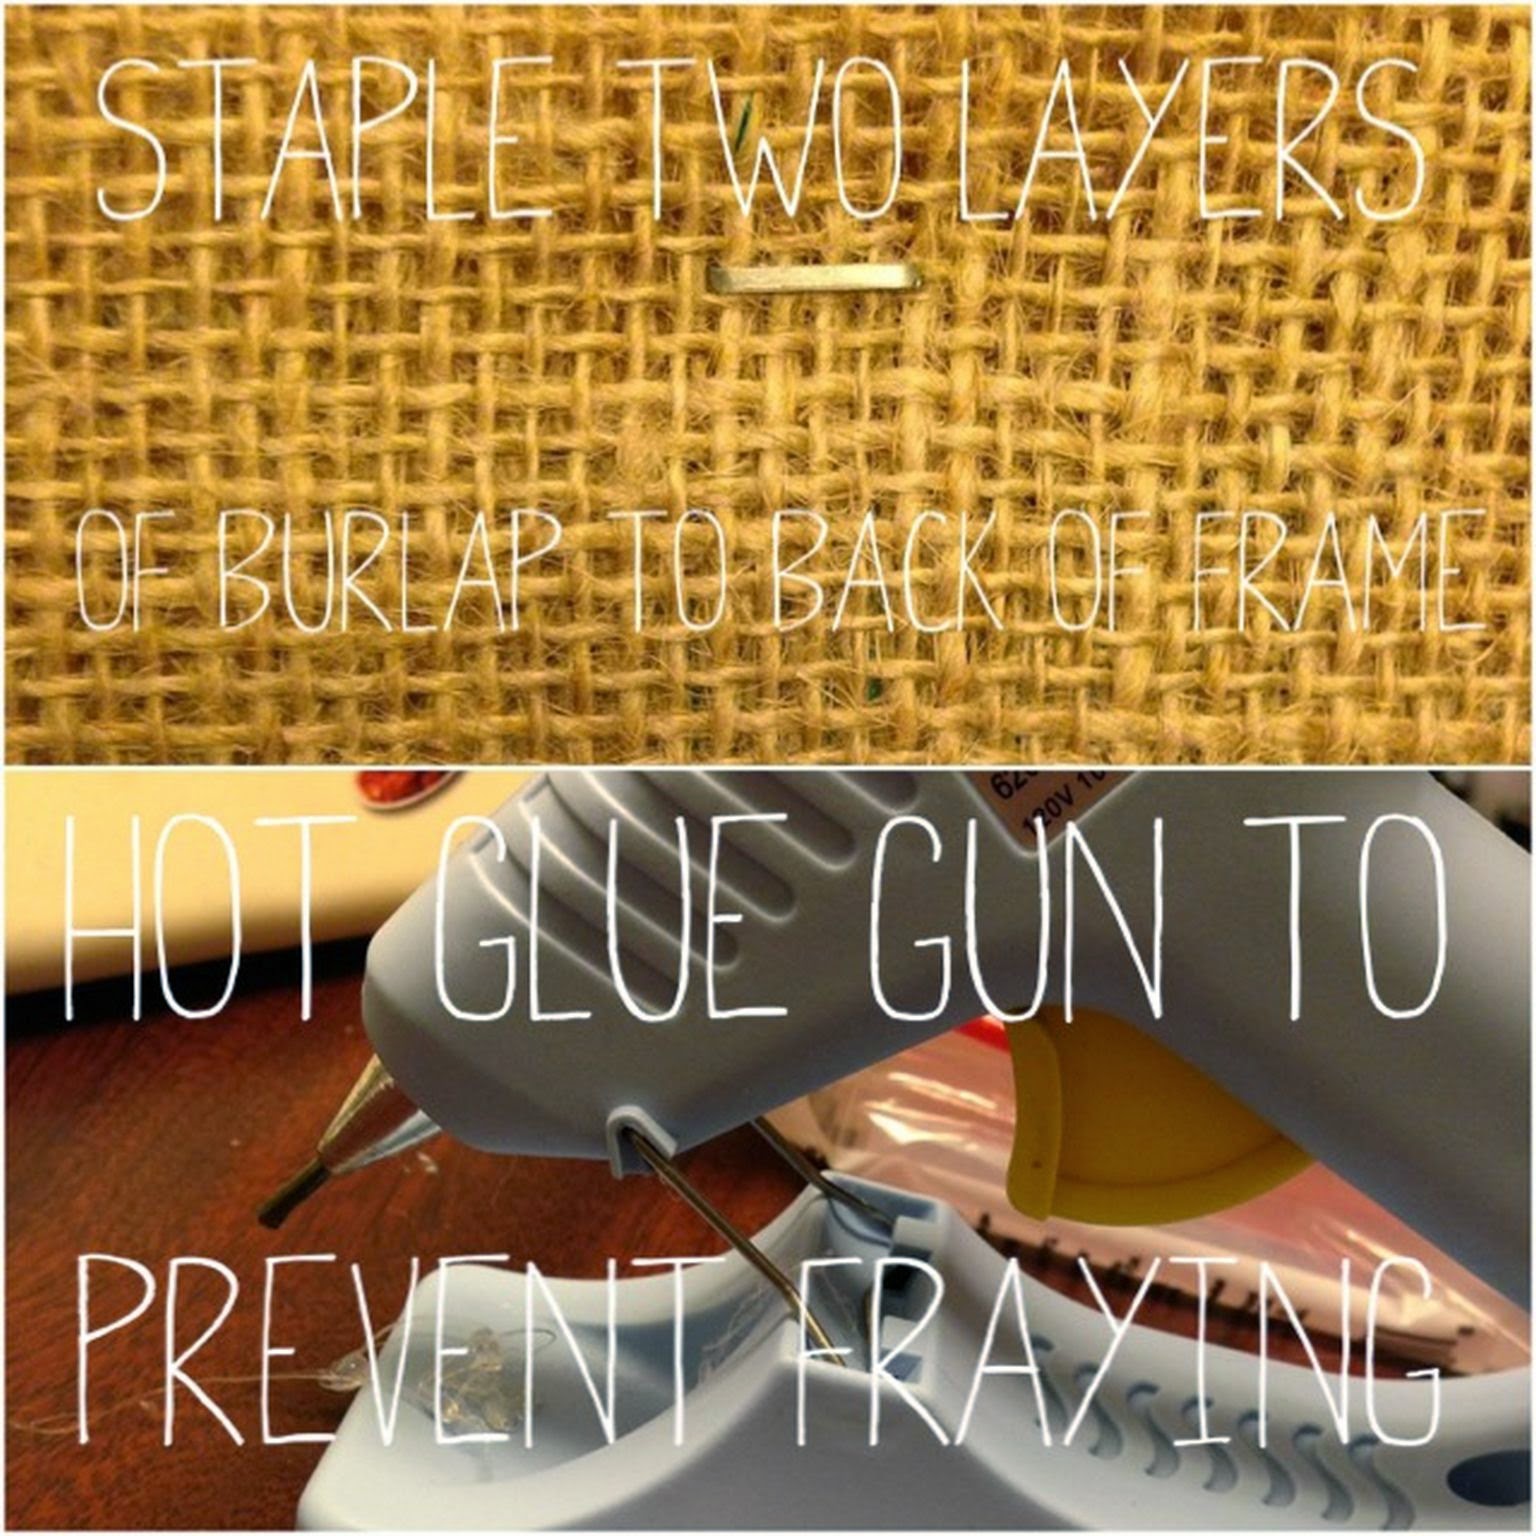
Burlap (enough to stretch two layers across the back of frame)
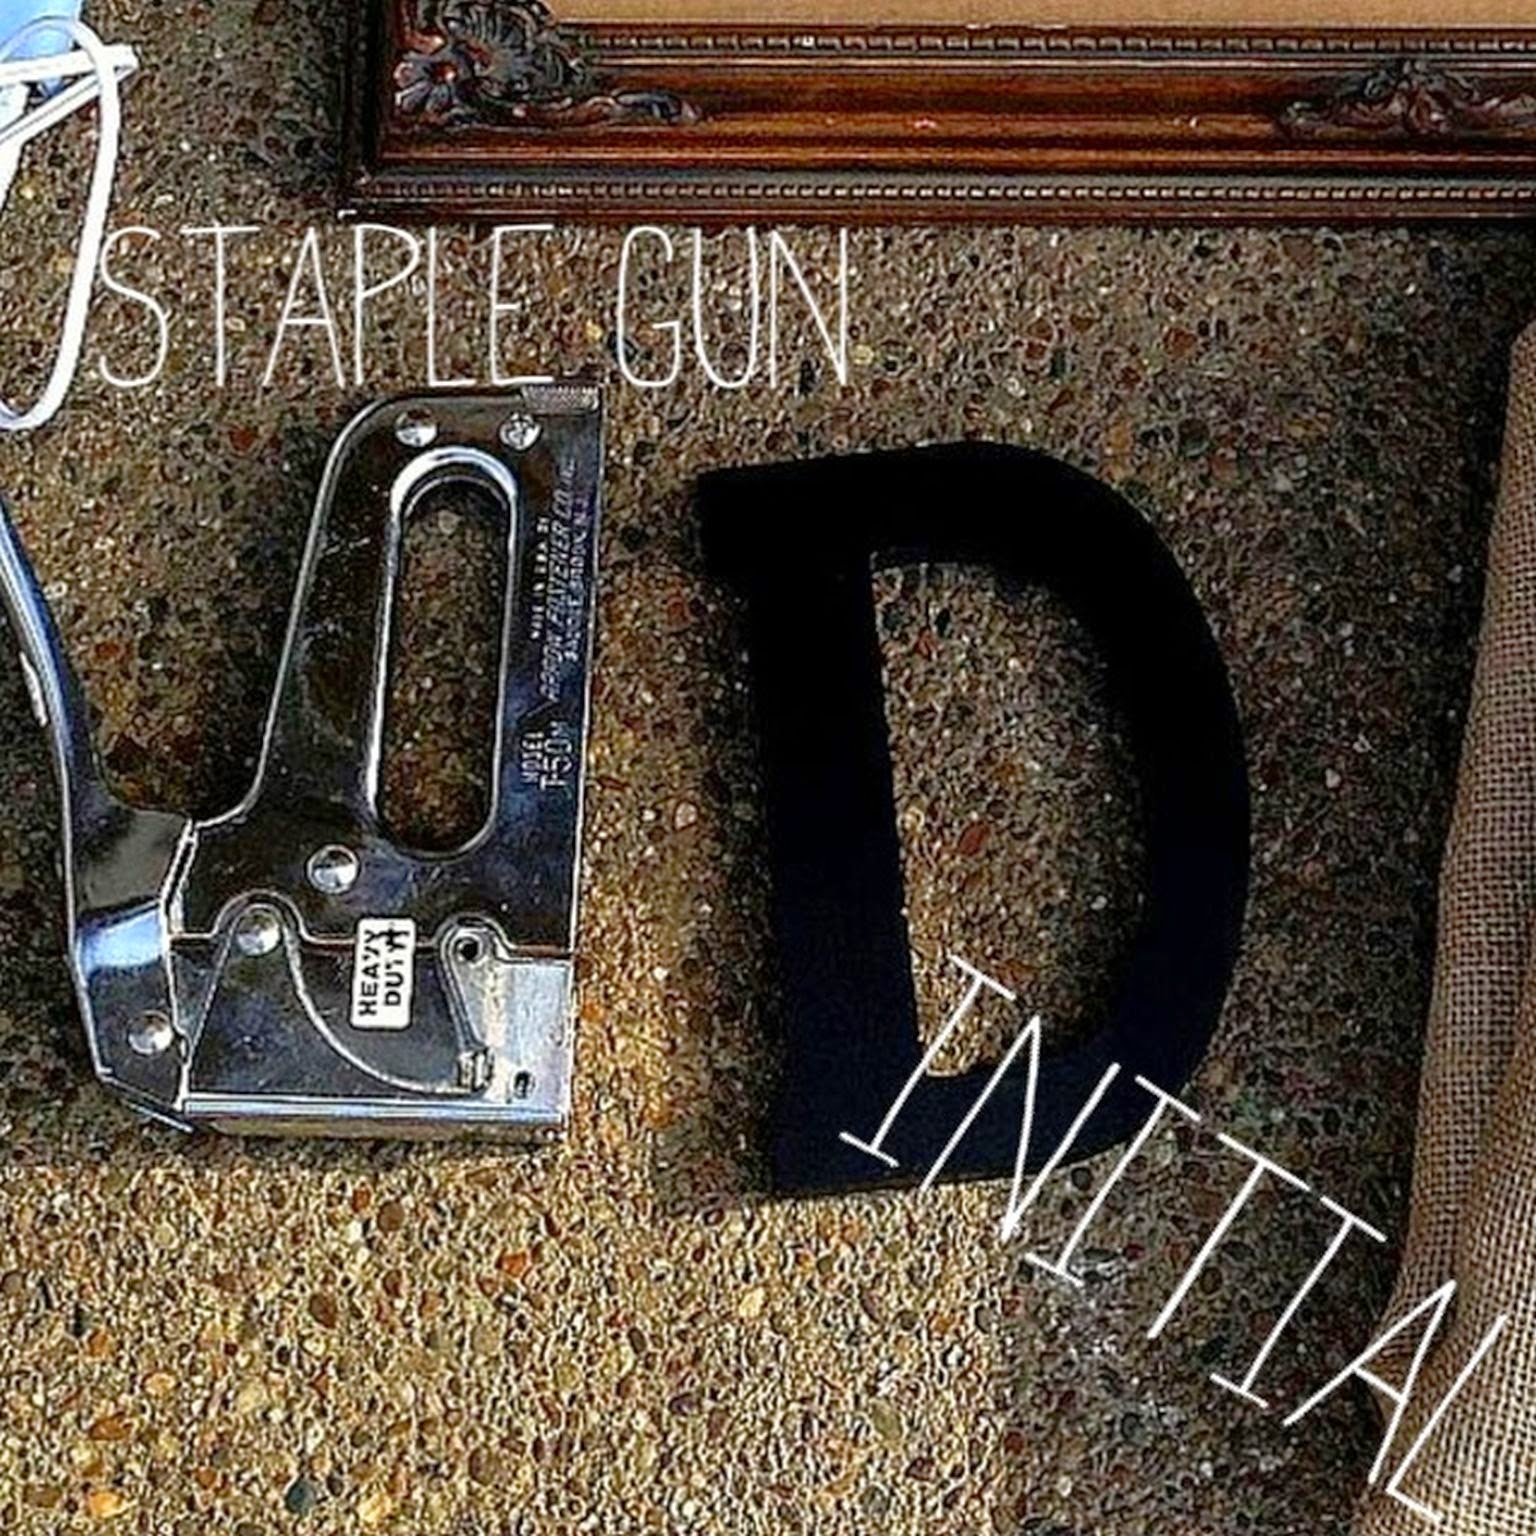
Staple gun
Hot glue gun
Wooden letter (size to preference)
Well-ventilated room or outdoor area
Cloth to safeguard surfaces against spray paint
Ribbon (optional)

I found my frame at an antique shop for a great price!  I cleaned it first, before spray painting, to ensure an even coat of paint.  When you spray paint the frame, make sure to hold the can at least several inches away from the surface and use a sweeping motion, slightly overlapping each time you go back and forth.  The paint I used allowed for a quick drying time in between coats, so I only had to wait a few minutes before applying a second coat.  I only applied two coats to the frame because I wanted a more vintage look, but you can add however many coats it takes to achieve your desired look.  The frame is dry to the touch within several minutes, but allow it to dry completely for a few hours.
While you are waiting, spray paint your letter, following the same process as the frame.  You do not need to paint the back because it will be stapled and hot glued to the burlap.  While the frame is drying, repeat the process for spray painting your initial, and let it dry.
Once the frame and the initial are dry, cut your burlap to fit the back of your frame.  You want enough burlap to make two layers to be sturdy enough to hold the weight of the letter when it is attached.  Remove the element that hangs the frame on the wall, and set aside.  Staple the burlap to the back of the frame around all four sides.  To prevent the burlap from fraying, use your hot glue gun to put dots across the edges of the burlap, also attaching it to the frame.
Glue the letter to the burlap on the front of the frame, and if you’d like a little pop of color, cut a piece of ribbon and glue it to your burlap as well, and let it dry.  Once it is dry, reattach the hanging element to the back of the frame.
Voile!  It is ready to be hung on a wall or given as a gift to a friend.  I absolutely love the vintage look of the frame and the burlap!  I’m thinking next time I will paint it turquoise.  You can do so much with spray paint!
Hope you enjoyed making this as much as I did.  Seriously, this was SUPER easy, and so much fun to make.  I will definitely be making more of these as gifts in the future, they are such a personal, special gift!
Let me know how yours turns out, and send me a picture!
Do you have any other fun DIYs involving burlap or picture frames?

signature


related posts

  • Summer, Resumes, and Anchors Away!Summer, Resumes, and Anchors Away!
  • Lilly’s Birth StoryLilly’s Birth Story
  • J.CREW FACTORY SUMMER ARRIVALSJ.CREW FACTORY SUMMER ARRIVALS
  • Blue & Yellow:  A Love AffairBlue & Yellow: A Love Affair
by admin 
20 Comments

About admin

View all posts by admin

Related Posts

  • Wednesday Wishlist: Printed Decorative Pillows from ElemenOPillows!
  • NAUTICAL STRIPES & POLKA DOT MIX
  • Wishlist Wednesday: Playful, Summer-y Notecard Obsessions
  • OOTD: Kelly Green for Spring
previous: Wishlist Wednesday: Playful, Summer-y Notecard Obsessions
next: Turquoise Tunic, White Skinny Jeans, and Neon

Comments

  1. Susan Jeffries says: June 6, 2013 at 10:42 am

    Whitley, this is awesome!! If I remarry my husband will you make one for me?;) Happy day! Susan

    Reply
  2. Susan Jeffries says: June 6, 2013 at 10:42 am

    Whitley, this is awesome!! If I remarry my husband will you make one for me?;) Happy day! Susan

    Reply
  3. Ginny says: June 6, 2013 at 1:01 pm

    Very cute! I like the idea of this for hanging jewelry too. So fun!
    Ginny

    Reply
  4. Ginny says: June 6, 2013 at 1:01 pm

    Very cute! I like the idea of this for hanging jewelry too. So fun!
    Ginny

    Reply
  5. Ginny says: June 6, 2013 at 1:01 pm

    Very cute! I like the idea of this for hanging jewelry too. So fun!
    Ginny

    Reply
  6. Jaime says: June 6, 2013 at 1:58 pm

    LOVE this! We should be friends so you can make me one for my wedding! 😉 LOVE, LOVE, LOVE!!!

    Jaime
    http://tobystailsblog.com

    Reply
  7. Jaime says: June 6, 2013 at 1:58 pm

    LOVE this! We should be friends so you can make me one for my wedding! 😉 LOVE, LOVE, LOVE!!!

    Jaime
    http://tobystailsblog.com

    Reply
  8. Alison @ Get Your Pretty On says: June 6, 2013 at 2:07 pm

    Oh my gosh, that is just too cool! LOVE this.

    Reply
  9. Alison @ Get Your Pretty On says: June 6, 2013 at 2:07 pm

    Oh my gosh, that is just too cool! LOVE this.

    Reply
  10. Lauren Abel says: June 6, 2013 at 4:48 pm

    Love that! So cute. It's amazing what you can find at thrift/antique stores. You could also do this same idea but wrap cork-board with the burlap for a little bulletin board. I'd like to find a way to thrift an old frame and turn it into a jewelery display. Thanks for the inspiration!

    Lauren
    Style of One's Own

    Reply
  11. Lauren Abel says: June 6, 2013 at 4:48 pm

    Love that! So cute. It's amazing what you can find at thrift/antique stores. You could also do this same idea but wrap cork-board with the burlap for a little bulletin board. I'd like to find a way to thrift an old frame and turn it into a jewelery display. Thanks for the inspiration!

    Lauren
    Style of One's Own

    Reply
  12. Lauren Abel says: June 6, 2013 at 4:48 pm

    Love that! So cute. It's amazing what you can find at thrift/antique stores. You could also do this same idea but wrap cork-board with the burlap for a little bulletin board. I'd like to find a way to thrift an old frame and turn it into a jewelery display. Thanks for the inspiration!

    Lauren
    Style of One's Own

    Reply
  13. Nathalie says: June 7, 2013 at 5:46 pm

    So pretty!! Makes me feel like getting my crafty on 🙂

    Reply
  14. Nathalie says: June 7, 2013 at 5:46 pm

    So pretty!! Makes me feel like getting my crafty on 🙂

    Reply
  15. Recreate and Decorate says: June 7, 2013 at 10:53 pm

    How cute! I love anything that uses burlap!
    visiting from The Happier Homemaker

    Reply
  16. Recreate and Decorate says: June 7, 2013 at 10:53 pm

    How cute! I love anything that uses burlap!
    visiting from The Happier Homemaker

    Reply
  17. Melissa@TheHappierHomemaker says: June 8, 2013 at 2:00 am

    Love the boots!! Great project! Thanks for linking up to the Summer Inspiration Party!

    Reply
  18. Melissa@TheHappierHomemaker says: June 8, 2013 at 2:00 am

    Love the boots!! Great project! Thanks for linking up to the Summer Inspiration Party!

    Reply
  19. Lauren Alexis says: June 10, 2013 at 8:28 pm

    this diy is great! i have been looking for some easier pieces to create for our office! thank you for the idea!

    Reply
  20. Lauren Alexis says: June 10, 2013 at 8:28 pm

    this diy is great! i have been looking for some easier pieces to create for our office! thank you for the idea!

    Reply

Leave Your Comments Cancel reply

Your email address will not be published. Required fields are marked *

This site uses Akismet to reduce spam. Learn how your comment data is processed.

meet Whitley

let’s connect

Current Favorites

Turn off your ad blocker to view content

Archives

Where I Shop

Amazon
Ann Taylor
Chicwish
Janie & Jack
J.Crew
J.Crew Factory
H&M
Kate Spade
L.L.Bean
Loft
Nordstrom
Old Navy
Sephora
Target
Tory Burch
Tuckernuck
Zappos 

SHOP MY OUTFITS

About
Contact
Shop

Follow my pins

LET’S CONNECT

Copyright © 2025 · Prima Donna theme by Georgia Lou Studios

Copyright © 2025 · Prima Donna on Genesis Framework · WordPress · Log in